Hello everyone.
Hope you've all been well. I'm back after a long Blogging absence with this quick and easy square card featuring the cute little owl from the now retired Aviary set from stamping up.
Sadly, the photos are not the best. :(
The little owl was stamped in Pool Party onto Whisper White cardstock, and mounted onto Basic Black and Pool Party cardstock, which was then mounted onto the Crumb Cake card. The little accent flower seems to make an appearance in just about every one of my posts. It's from the Itty Bitty Punch Pack. It has been embellished with an adhesive half pearl. The sentiment is from Hero Arts.
And that's all there is to it!
Such a cute, quick and easy card that is has become one of my 'go to' cards, having made a few of them now. :)
Andrea
.
Andrea
Showing posts with label Itty Bitty Punch Pack. Show all posts
Monday, July 20, 2015
Sunday, March 8, 2015
Pyjama / Sleepover / Slumber Party Invitations
If there's one thing that will bring me out of the crafting woodworks, it's my daughters' birthdays. And yep, it is that time again and boy, it sure feels good to be crafting again.
In keeping with my simple style, these invitations had to be cute with clean lines, and quick to make. The only brief I received from Mia and Demi were that they had to be in pink and blue tones, respectively. Here is what I came up with...
The base card of Whisper White and Crumb Cake were cut using the Window Frames Collection Framelits. The little PJ's were cut out of SU card and scrapbooking papers, using a Sizzix die that I own. The little flowers were cut using one of the punches from the Itty Bitty Punch Pack and embellished with an adhesive pearl. The little tags were personalised and cut using circle and scallop circle punches from SU. They were tied on using SU twine and ribbon from my stash. The gorgeous little coat hangers are from my stash. I purchased them years ago, hoping to use them one day. They sure came in handy. :)
I love how they turned out and I love that they were fairly quick to put together.
Now bring on those parties! :)
Andrea
In keeping with my simple style, these invitations had to be cute with clean lines, and quick to make. The only brief I received from Mia and Demi were that they had to be in pink and blue tones, respectively. Here is what I came up with...
The base card of Whisper White and Crumb Cake were cut using the Window Frames Collection Framelits. The little PJ's were cut out of SU card and scrapbooking papers, using a Sizzix die that I own. The little flowers were cut using one of the punches from the Itty Bitty Punch Pack and embellished with an adhesive pearl. The little tags were personalised and cut using circle and scallop circle punches from SU. They were tied on using SU twine and ribbon from my stash. The gorgeous little coat hangers are from my stash. I purchased them years ago, hoping to use them one day. They sure came in handy. :)
I love how they turned out and I love that they were fairly quick to put together.
Now bring on those parties! :)
Andrea
Saturday, October 4, 2014
Punch Art Lioness Card
I just loved that little lion from my last post so much that I decided to make a girl / lioness version of him. Here she is...
For the lioness version, I added a fringe (bangs), eyelashes and a little flower in her hair. The leaves were cut with the Bird Punch. All other supplies used are as my previous post.
She's such a sweetie. :)
For the lioness version, I added a fringe (bangs), eyelashes and a little flower in her hair. The leaves were cut with the Bird Punch. All other supplies used are as my previous post.
She's such a sweetie. :)
Wednesday, April 16, 2014
Bride To Be's Kitchen Tea Bouquet
My nephew is getting married next month and his fiancée's Kitchen Tea is coming up next week. I wanted my card for the occasion to be extra special, so searching the net for inspiration I came across this card for inspiration, and based my own card on it:
http://stampingville.blogspot.com.au/2011/08/bouquet-card-for-bride-to-be.html
Here is my card:
The card base colours are Crumb Cake and Pretty in Pink.
I cut slivers of Old Olive card stock and bound them together with pink ribbon. The flowers were punched with one of the flowers from the Itty Bitty Punch Pack, and embellished with tiny adhesive half-pearls. I printed the sentiment on my computer and punch it out using the Jewellery Tag Punch.
I just love how this turned out!
Andrea
http://stampingville.blogspot.com.au/2011/08/bouquet-card-for-bride-to-be.html
Here is my card:
The card base colours are Crumb Cake and Pretty in Pink.
I cut slivers of Old Olive card stock and bound them together with pink ribbon. The flowers were punched with one of the flowers from the Itty Bitty Punch Pack, and embellished with tiny adhesive half-pearls. I printed the sentiment on my computer and punch it out using the Jewellery Tag Punch.
I just love how this turned out!
Andrea
Labels:
Itty Bitty Punch Pack,
Jewellery Tag Punch,
Punches
Saturday, March 29, 2014
Bunny Hugs
Look at this cute bunny I have to show you today:
She features on a birthday card I made for one of Mia's friends, but she could just as easily be at home on an Easter card or tag. Excuse me while I add that thought to my looooong list of things to try.
Now, where was I? Oh, yes. I was about to tell you that I can't remember the name of this adorable bunny stamp or who it's manufactured by, and I'm too tired to go upstairs and check, so I will check tomorrow and update this post with the info. All other supplies used to make this card are from Stampin' Up!, except for the cloud die, which I seem to be using on just about every card at the moment. Obsessed much? Ha ha...
Andrea :)
Ok, I've checked and the stamp is by Stampavie.
She features on a birthday card I made for one of Mia's friends, but she could just as easily be at home on an Easter card or tag. Excuse me while I add that thought to my looooong list of things to try.
Now, where was I? Oh, yes. I was about to tell you that I can't remember the name of this adorable bunny stamp or who it's manufactured by, and I'm too tired to go upstairs and check, so I will check tomorrow and update this post with the info. All other supplies used to make this card are from Stampin' Up!, except for the cloud die, which I seem to be using on just about every card at the moment. Obsessed much? Ha ha...
Andrea :)
Ok, I've checked and the stamp is by Stampavie.
Labels:
Dies,
Itty Bitty Punch Pack,
Non-Stampin' Up stamps,
Punches
Wednesday, February 19, 2014
Next Batch of Invitations
Hi everyone!
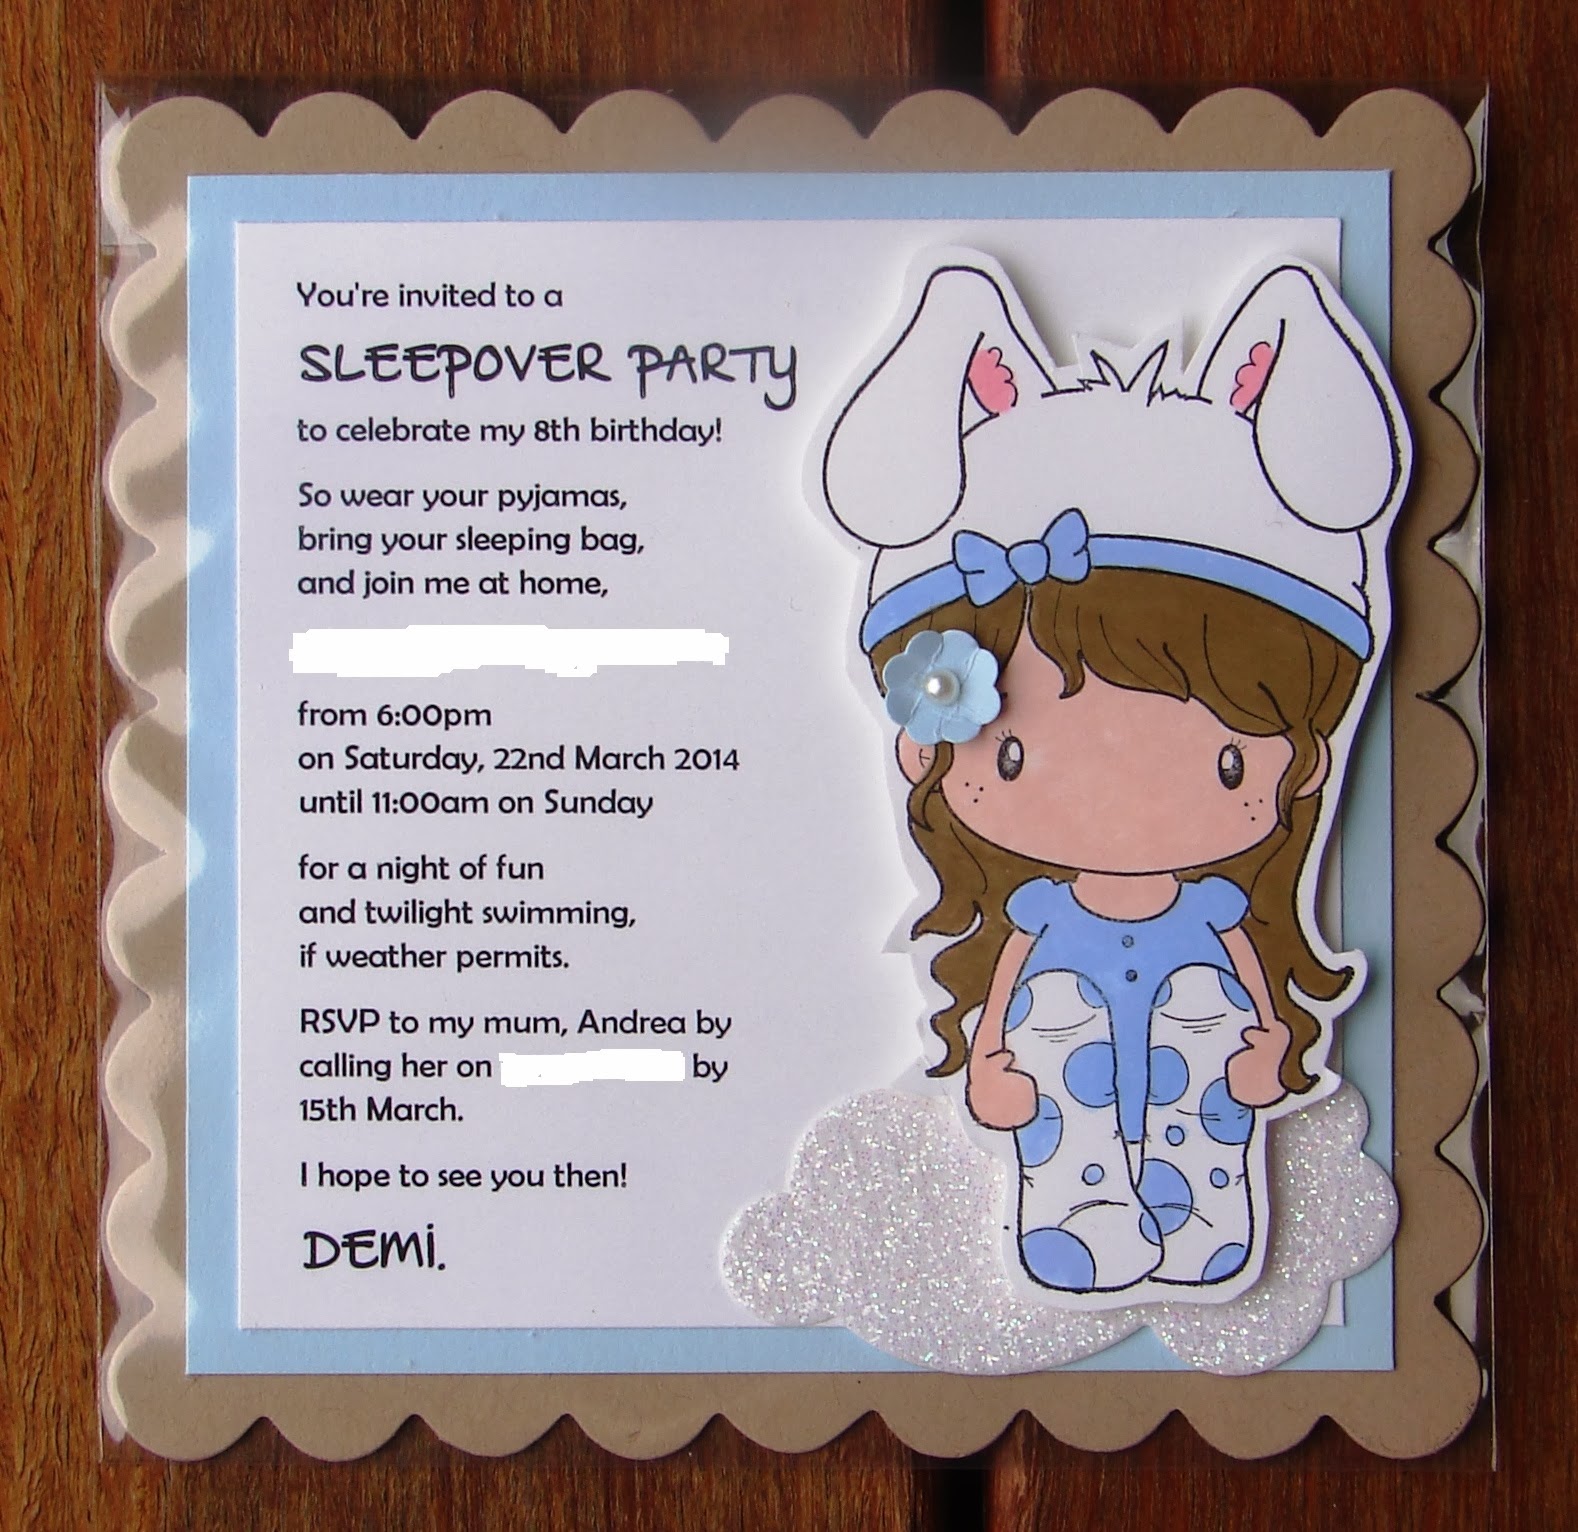
I'm back today to show you Demi's birthday invitations...
Another gorgeous image by C.C. Designs called Sweet Pixies Lucy Bunny. She was stamped in black StazOn ink and coloured with Stampin' Up! markers. All other supplies are from Stampin' Up! - cardstock, scallop square die, Itty Bitty Punch set and adhesive half pearls.
I'm back today to show you Demi's birthday invitations...
Sunday, February 16, 2014
It's Invitation Time Again!
Yep, it's that time of year again. That time when the girls' birthdays are looming and the air is filled with crazy excitement. Oh, to be a kid again. :)
Here are Mia's invitations to her slumber party, which have recently been given out to her school friends...
This cute little girl in her PJ's is from C.C. Designs (Sugarplums PJ Emma). She was stamped in Black StazOn ink and coloured with Stampin' Up! markers.The Crumb Cake background was cut using the Scallop Square die from Stampin' Up! and the little flower in the girl's hair was punched with one of the punches from the Itty Bitty Punch Pack, also from Stampin' Up! The cloud was also cut using a die.
The shine you can see in the photos is from the cellophane bags that I used instead of envelopes.
Now, let the countdown to the party begin. Woo hoo!
Catch you soon.
Andrea
Here are Mia's invitations to her slumber party, which have recently been given out to her school friends...
This cute little girl in her PJ's is from C.C. Designs (Sugarplums PJ Emma). She was stamped in Black StazOn ink and coloured with Stampin' Up! markers.The Crumb Cake background was cut using the Scallop Square die from Stampin' Up! and the little flower in the girl's hair was punched with one of the punches from the Itty Bitty Punch Pack, also from Stampin' Up! The cloud was also cut using a die.
The shine you can see in the photos is from the cellophane bags that I used instead of envelopes.
Now, let the countdown to the party begin. Woo hoo!
Catch you soon.
Andrea
Saturday, March 16, 2013
Mia's 10th Birthday Rock Pool Party
As promised, I'm back today to show you photos of the projects from Mia's party!
Firstly, we have the invitations...
The invitations featured different images from a stamp set of girls wearing swimmers, coloured in with SU inks and an Aqua Painter on watercolour paper. Cardstock colours used were Whisper White, Real Red and Bashful Blue (embossed with a bubble embossing folder). The little flowers were made using a punch from the Itty Bitty Punch Pack. The invites were presented in a clear cellophane bag instead of an envelope to showcase the invitation, and embellished with red ribbon, a personalised name tag punched with the Jewellery Tag, and a pewter charm of a bikini. Mia loved them and so did the recipients!
Next up are the party bags...
The tags were cut from Bashful Blue cardstock using the Two Tags die and the flower was made using five scallop circles punched using the Scallop Circle Punch.
I also used these tags for the lolly bar...
The lolly bar noodle boxes, personalised with name tags made out of the Scallop Circle Punch and a circle punch...
The pinata...
Paper lantern and pom pom decorations...
The rock pool cale and cupcakes that I made...
And finally... a photo of the birthday girl herself, with her underwater camera and onsie pyjamas...
Take care,
Andrea
Firstly, we have the invitations...
The invitations featured different images from a stamp set of girls wearing swimmers, coloured in with SU inks and an Aqua Painter on watercolour paper. Cardstock colours used were Whisper White, Real Red and Bashful Blue (embossed with a bubble embossing folder). The little flowers were made using a punch from the Itty Bitty Punch Pack. The invites were presented in a clear cellophane bag instead of an envelope to showcase the invitation, and embellished with red ribbon, a personalised name tag punched with the Jewellery Tag, and a pewter charm of a bikini. Mia loved them and so did the recipients!
Next up are the party bags...
The tags were cut from Bashful Blue cardstock using the Two Tags die and the flower was made using five scallop circles punched using the Scallop Circle Punch.
I also used these tags for the lolly bar...
The lolly bar noodle boxes, personalised with name tags made out of the Scallop Circle Punch and a circle punch...
Paper straws personalised using the small Scallop Circle punch and small circle punch...
The pinata...
Paper lantern and pom pom decorations...
The rock pool cale and cupcakes that I made...
And finally... a photo of the birthday girl herself, with her underwater camera and onsie pyjamas...
Happy Birthday, gorgeous girl! And I'll be doing it all exactly the same in a couple of weeks for my baby girl's party, as she wants everything just like her big sis. :)
Take care,
Andrea
Thursday, March 14, 2013
My Big Girls Turns 10!
I can't believe that it was ten years ago that I gave birth to a gorgeous, flawless little baby whom we named Mia.
Mia has grown so much over these last ten years, becoming a beautiful, happy, intelligent, witty and loving girl. We feel so blessed to call her our daughter.
This is the card I made for her...
The card features a girl holding a camera which is so appropriate since we gave Mia an underwater camera.
Colours used were Crumb Cake, Pretty in Pink, Whisper White and glitter paper. The image was coloured with Stampin' Up! markers and the camera lens and glasses were accentuated with lossy Accents. The sentiment is from Happiest Birthday Wishes. The little flowers were created with one of the punches from the Itty Bitty Punch Pack and embellished with adhesive rhinestones.
Be sure to visit here again real soon for photos of her birthday invitations and other projects from her party!
Andrea
Mia has grown so much over these last ten years, becoming a beautiful, happy, intelligent, witty and loving girl. We feel so blessed to call her our daughter.
This is the card I made for her...
The card features a girl holding a camera which is so appropriate since we gave Mia an underwater camera.
Colours used were Crumb Cake, Pretty in Pink, Whisper White and glitter paper. The image was coloured with Stampin' Up! markers and the camera lens and glasses were accentuated with lossy Accents. The sentiment is from Happiest Birthday Wishes. The little flowers were created with one of the punches from the Itty Bitty Punch Pack and embellished with adhesive rhinestones.
Be sure to visit here again real soon for photos of her birthday invitations and other projects from her party!
Andrea
Friday, February 22, 2013
Love & Laughter Bridal Shower
My nieces will be having their Bridal Showers/Kitchen Teas together this weekend. It's all very exciting. One niece getting married next month and the other niece getting married the month after. No wonder my sister (their mother) is freaking out!
I'll be making their Kitchen Tea cake so I'm stressed out too. Wish me luck.
In the meantime, I'll show you the cards I made for them...
For these cards I used the Love & Laughter stamp set and the sentiment from Teeny Tiny Sentiments. Cardstock colours are Whisper White, Pool Party and silver glitter paper. The flowers were punched with one of the punches from the Itty Bitty Punch Pack.
Now, wish me luck with the cake!
See you soon.
Andrea :)
I'll be making their Kitchen Tea cake so I'm stressed out too. Wish me luck.
In the meantime, I'll show you the cards I made for them...
Now, wish me luck with the cake!
See you soon.
Andrea :)
Saturday, February 16, 2013
Long Awaited Class
Firstly, a big thank you to 'my ladies' for jumping at the chance to come to my latest class. The response was overwhelming, especially since my lst class was months and months ago.
We started the night with some 3D projects that I have been chomping at the bit to have the ladies try. Firstly, a standing calender:
I've had this idea since I received one of these calendars from my talented upline, Diane Barnes from Colour Me Happy. Here is the link to Di's instructions on how to make them. I used the same fold concept but I changed the dimensions.
I used a Basic Grey card base, Pretty in Pink cardstock and some Bashful Blue paper, Label Collection Framelits, and little calendars I found online. The butterflies were stamped on Whisper White card using Pretty in Pink ink, and cut with the Elegant Butterfly Punch. They were embellished with adhesive pearls.
As I was preparing the calendar kits for the class, I made some extra kits so that Mia's friends can each make one at her birthday party next month.
The second project was this little handbag, made using the Petite Purse Die:
The kits for this project were in different colours but the one you see here was made with a So Saffron card base and So Saffron paper. The ladies made their own carnation using the new little Scallop Circle Punch. The carnation was embellished and held together with a gold brad. The leaves were cut with the Double Step Bird Punch. The little tag was stamped In Lucky Limeade with one of the stamps from the Sale-a-Bration set, Pretty Petites and punched out with the matching Petite Curly Lanel Punch. The tiny flower was punched from Pretty in Pink cardstock using a punch from the Itty Bitty Punch Pack.
The third project was a simple and serene sympathy card featuring the Framelits Window Frame Dies and matching Festive Paper Piercing Pack:
The base is Whisper White and features an image and sentiment are from the Love & Sympathy stamp set . Ink colours used were Wisteria Wonder, Lucky Limeade and basic Black.
The final project of the night was this cute 'get well' card featuring the new Oh, Whale stamp set:
How cute is this little guy? He was stamped in Cherry Cobbler, cut out and propped onto the card using foam dots. He has Pool Party twine tied around his tail. The Tempting Turquoise waves were created using a circle punch. So, so simple. Love it!
Thanks for visiting my Blog. I hope you found something to inspire you. Feel free to leave a comment.
Catch you all soon.
Andrea :)
We started the night with some 3D projects that I have been chomping at the bit to have the ladies try. Firstly, a standing calender:
I've had this idea since I received one of these calendars from my talented upline, Diane Barnes from Colour Me Happy. Here is the link to Di's instructions on how to make them. I used the same fold concept but I changed the dimensions.
I used a Basic Grey card base, Pretty in Pink cardstock and some Bashful Blue paper, Label Collection Framelits, and little calendars I found online. The butterflies were stamped on Whisper White card using Pretty in Pink ink, and cut with the Elegant Butterfly Punch. They were embellished with adhesive pearls.
As I was preparing the calendar kits for the class, I made some extra kits so that Mia's friends can each make one at her birthday party next month.
The second project was this little handbag, made using the Petite Purse Die:
The kits for this project were in different colours but the one you see here was made with a So Saffron card base and So Saffron paper. The ladies made their own carnation using the new little Scallop Circle Punch. The carnation was embellished and held together with a gold brad. The leaves were cut with the Double Step Bird Punch. The little tag was stamped In Lucky Limeade with one of the stamps from the Sale-a-Bration set, Pretty Petites and punched out with the matching Petite Curly Lanel Punch. The tiny flower was punched from Pretty in Pink cardstock using a punch from the Itty Bitty Punch Pack.
The third project was a simple and serene sympathy card featuring the Framelits Window Frame Dies and matching Festive Paper Piercing Pack:
The base is Whisper White and features an image and sentiment are from the Love & Sympathy stamp set . Ink colours used were Wisteria Wonder, Lucky Limeade and basic Black.
The final project of the night was this cute 'get well' card featuring the new Oh, Whale stamp set:
How cute is this little guy? He was stamped in Cherry Cobbler, cut out and propped onto the card using foam dots. He has Pool Party twine tied around his tail. The Tempting Turquoise waves were created using a circle punch. So, so simple. Love it!
Thanks for visiting my Blog. I hope you found something to inspire you. Feel free to leave a comment.
Catch you all soon.
Andrea :)
Subscribe to:
Posts (Atom)


+blurred.jpg)
+blurred.jpg)