Monday, August 31, 2009

More All in the Family

Here are two cards I made using a familiar layout & some cute little characters from the All in the Family stamp set...


Supplies used:

Stamps: All in the Family, Best Yet (hostess set), Think Happy Thoughts, non-SU number stamp sets.

Cardstock: Very Vanilla, Chocolate Chip, Pretty in Pink, Bashful Blue, watercolour paper.

Ink: Black StazOn, Pretty in Pink, Bashful Blue, Chocolate Chip and Blush Blossom markers.

Other: Big Kick with Cuttlebug Embossing Folders, Square punches, Scallop Oval and Large Oval punches, Scallop Circle and Circle punches, pink ribbon.

I think that's it!

Well, thanks for stopping by. I hope to be back soon as I'll have some similar cards to show you once I finish them.

Bye...

Directions for little gift bags.

Hi all!

I have had a few requests for the directions to make the cute little bags I posted last week. Well, here goes...

The bags are made with half a 30 x 30cm inch piece of doublesided scrapbooking paper, so you start with a piece that is 30cm x 15cm.

Hold the piece horizontally & mark lines vertically at 11cm, 14cm, 25cm & 28cm. Then score horizontally at 12cm from the top.

Score all lines, except for the top horizontal line. You will be left with a small rectangle on the bottom, right hand side of the bag. Cut this small rectangle away.

Now cut all vertical lines from the bottom up to the first horizontal line from the bottom. Fold along all the scored lines. Now turn the sheet over and score a horizontal line 3cm from the top. This fold will be the folded over detail on the top of the bag. Am I making sense?

Turn the sheet back to how you started and begin to tape the bag together at the base. Tape the small flaps under the first larger flap and end with the other last flap at the very bottom of the bag. Then place a strip of tape along the thin strip of the bag that is left and tape it to the bag on the inside.

Now all you need to do is punch four holes using the Horizontal Slot Punch for the handles, which are made from 1cm strips of coordinating cardstock. Attach the handles using brads, and make a coordinating tag. Voila!

I hope it all makes sense without photos.

well, good luck & most importantly have fun!

Thursday, August 27, 2009

Today's Class

A big thank you to all the ladies who participated in today's class!

Let me tell you that I am completely stuffed from all the nibblies!
Well, each of us made this card....
...using the Petal Pizzaz stamp set (one of my current favourite sets) and the Best yet hostess set, together with the colour combination of Whisper White, Night of Navy, Brocade Blue and Old Olive, and the Scallop Circle punch, Large Oval punch and the new Scallop Oval punch.

The second project was one of these cute little handbags...


The red bag is the example I had prepared using the now obsolete (but still gorgeous) Ginger Blossom scrapbooking paper, and the grey & blue bag is an example of the gift bags the participants made using the equally lovely Urban Garden papers, together with Basic Grey cardstock & ink. The Scallop Circle punch, 1 3/8" Circle punch and the 1 1/4" punch were used for the tag, as was a little chain from a bargain shop.
I think the ladies were pretty pleased with their projects and it's great to see them becoming more confident with their efforts. Can't wait for the next class. At their request, we'll be making wedding and engagement cards. Oh, the pressure of coming up with ideas!
Bye for now & enjoy the sunshine.

Friday, August 21, 2009

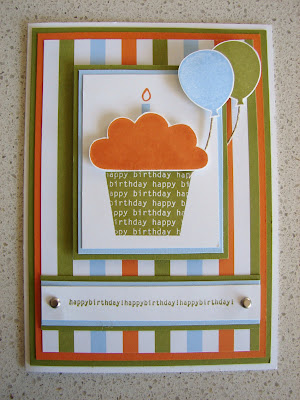
Another Big Bold Birthday Cupcake Card

Two posts in one day! Yeah, me!

Here is a very fun, fresh and young birthday card made for one of Mia's school friends....


I used paper remnants from the Petal Party Simply Scrappin' Kit, (boy, this kits goes a loooong way!) together with Whisper White, Old Olive, Pumpkin Pie and Pink Passion.

Here are some photos of the inside of the card & the matching envelope...


You may remember a similar card that I made recently. Actually, I made it using the exact same layout but in different colours. Here is the link to that card and others made using the Bog Bold Birthday stamp set: http://stampmyday.blogspot.com/search/label/Big%20Bold%20Birthday

Well, thanks for stopping by again. I hope you're enjoying this great weather we've been having. I hear we're in for some more of it this weekend. How lucky are we?

Take care.
Andrea.

Thoughts and Prayers Get Well Card

Hi everyone!

It's been a while, huh? I've just been so busy with day to day things. Hopefully, it won't be so long until the next post.

Well, today I have a "Get Well" card made using the Thoughts and Prayers stamp set...


For this card I used a lovely colour combination of Chocolate Chip, Pretty in Pink, Old Olive & Very Vanilla. I used Stampin' Write markers in Chocolate Chip, Old Olive & Pretty in Pink to colour the image. Stampin' Write markers are fabulous for multi-coloured images. You use them just as you would a texta, directly onto the rubber of a stamp, & stamp your image as you normally would.

I also used little clear crystals & a flower from my stash.

I hope you like it, but more importantly, I hope it inspires you to create something today!

Take care.
Andrea.

Monday, August 3, 2009

Hostess Gift Bag

As promised, here is the little gift bag I created for my hostess using the lovely Urban Garden papers...


It turned out so cute & it was so easy & relatively quick to make. I also used circle punches, circles punches & the Horizontal Slot punch, the Best Yet level 1 hostess set, silver brads, Night of Navy and Whisper White cardstock, Night of Navy ink.

Wanna know what was in it? Some little Lindt chocolates in white tissue paper.

Well, that's all from me today. I hope you all have a great day & manage to squeeze in some creativity.

Take care,

Andrea

Petal Pizzaz Demo Cards

Hi eevryone.
I hope you all had a great weekend & are geared up for the week ahead. The weather sure is getter better, isn't it?
Well, here are the two cards that I demonstrated on the weekend...

The cards were created using the gorgeous Petal Pizzaz and Short & Sweet stamp sets, So Swirly jumbo wheel, the Tearing Edge, Whisper White, Pumpkin Pie, Old Olive & Not Quite Navy cardstock, Pumpkin Pie, Old Olive & Not Quite Navy ink pads, the Scallop Circle Punch, Large and small oval punches & gold brads.
Stay tuned for my hostess gift!

Tuesday, July 21, 2009

Wild About Turning 3!

A little friend of ours is turning three this weekend & she's having a wild animal theme. Here is the card I came up with...

I have to rush off to pick up my daughter from a sleepover at her cousin's house & then take her to swimming lessons so I don't have time to note all the supplies I used, but if you'd like to know any details, please just ask.

Take care,

Andrea

Sunday, July 19, 2009

Snowmen in July

I just love these stamps in the Holiday Lineup stamp set & this is the first time I've inked up one the stamps from it. You know it won't be long before we're all panicking because we haven't made our Christmas cards! Happens every year, doesn't it? Ha ha...

I couldn't decide which photos I liked the best so you get to see all of them. Lucky you - ha ha!


I used my beloved Big Kick with the Cuttlebug Snow Dots (I think that's the name of it) embossing folder on the Bashful Blue Cardstock, which was then mounted onto the Not Quite Navy cardstock & then onto the Whisper White card.

The image was stamped onto watercolour paper with black StazOn ink & coloured with my Not Quite Navy, Bashful Blue & Pumpkin Pie markers. It was adhered onto Not Quite Navy cardstock & then mounted onto the card with dimensionals. The finishing touch was the glitter to resemble snow.

The sentiment on the front is from the Level 1 Hostess Set, Best Yet. It was stamped onto Pumpkin Pie cardstock & punched out with the large oval punch. The greeting inside is from Many Merry Messages.

Cute little fellows aren't they?

Matching Card

Well here is the matching card I promised you yesterday, except this time I used little pink crystals instead of brads...


Everything about it is really easy. The only thing that takes a little time is the cutting.

Well, thanks for looking & enjoy your Sunday.

Saturday, July 18, 2009

On a Roll!

Hello! I hope you're enjoying your weekend.

Here is yet another double page layout I have managed to complete despite it being school holiday time. My girls and I have managed to enjoy quite a bit of crafting in between all the other school holiday activities.

This layout is of Demi's first day of preschool...


Isn't she the cutest thing cute?

For this layout I used the now retired Certainly Celery DSP teamed with the gorgeous Petal Pizzaz stamp set. This set is not only a fabulous set for making greeting cards but it also simply perfect for making embellishments for scrapbooking pages, as you can see here. I stamped the flowers and leaves in Pretty in Pink and Certainly Celery, cut them or punched them out, pierced gold brads through the flower centres and voila! So effective. The sentiments are from the Level 1 Hostess Set, Best Yet and the now retired Live Your Dream set.

Hopefully I'll be back tomorrow with two cards, one of them in the same theme of this layout, so stay tuned!

By the way, I apologise if this post looks like it's all crammed together, but for some strange reason, Blogger doesn't seem to acknowledge my paragraphs, or it wants to put in huge gaps between my paragraphs. Grrrr!!!!

Friday, July 10, 2009

Mucho Scrapbooking!

Yeah me! I'm finally getting around to catching up on my scrapbooking. I'm not doing too bad as I'm up to January of this year.

The first two double layouts (one for Mia's album & one for Demi's) were completed using the Petal Party Simply Scrappin' Kit...


For this next double layout I used the left over Old Olive cardstock from the Petal Party Simply Scrappin' Kit...


Finally, I have Mia's Year One school photo to show you...


This one was completed with the beautiful Urban Garden papers. This was also part of a double layout but since the other side had a class photo I didn't think it was appropriate to post a photo of all the other children.

Phew! I sure have been busy.

I haven't posted all of the supplies I used but if you'd like to know anything, please just ask.

Well, enjoy your weekend & hope to be back soon.

Andrea.

Friday, July 3, 2009

A Very Fairy Birthday

I have had another play with one of my stamps from my pre-SU! days. This time I used a little fairy or ballerina stamp. The card is for one of Mia's friends.


I also used Short & Sweet stamp set for the sentiment, Very Vanilla, Basic Black & Real Red cardstock, watercolour paper, black StazOn ink pad, Real Read, Chocolate Chip, Pretty in Pink & Blush Blossom markers, blender pens, oval punches, Cuttlebug Bug Heart Blocks embossing folder, my Big Kick, flowers, silver brads & glitter.

Thanks for taking to time to stop by. Hope to be back soon.
Andrea.

Wednesday, July 1, 2009

Make 'n' Take

Here is the Make 'n' Take from my Demo on the weekend...


Since Father's Day will be upon us before we blink, I went with a Father's Day or masculine themed card. Yes, it is that layout again, but in my defence, I had prepared the packs before I promised to not repeat that same layout - ha ha!
Supplies used: Very Vanilla, Basic Black and Sahara Sand cardstock, Basic Black ink, Seaside and Wonderful Favourites stamp sets, square punches and oval punches.
Very simple but very effective.
Take care & thanks for taking the time to visit my Blog. Please feel free to leave a comment.
Bye...

Wild About Elephants!

Here's a cute little card I demo'd on the weekend...


Isn't the little elephant just the cutest thing? It's from the Wild About You stamp set. The sentiment & flower on the elephant are from Short & Sweet set.

I also used the Nursery Letters jumbo wheel with the Certainly Celery cartridge for the background, Whisper White, Bashful Blue, Barely Banana & Certainly Celery cardstock, Bashful Blue & Certainly Celery ink pads, large & small oval punches & the Tearing Edge ruler for the paper tearing.

Thanks for stopping by!

Friday, June 26, 2009

Gorgeous Gown

While getting my new craft room in order I can across all of my old non-SU! stamps & I could resist having a play. I have had this stamp for a couple of years (I think) but I have never used it...up until now, that is. Anyway, here is the card I came up with...


Of course, all other supplies are from SU! except for the Cuttlebug Heart Blocks embossing folder & the little flowers - Short and Sweet stamp set for the sentiment, Very Vanilla, Chocolate Chip & Pretty in Pink cardstock, watercolour paper, StazOn ink, Chocolate Chip & Pretty in Pink markers, Blender Pens and brads.

I must say, now that I've 'discovered' watercolouring, I'm LOVING it! I don't know if I'm any good at it - Ha ha! - but I'm really enjoying it & that's all that matters, right?

Creating in my New Craft Room!

Yippee!!! My craft room has been set up & I have even managed to have a little play in it. I can't tell you how lovely it is to not have to stamp standing up. Everything is now within my reach & it looks really good, if I may say so myself. I'm off to Ikea tomorrow to buy some little nic-nacs for it.

Anyway, here is a juvenile birthday card that I created using the Big Bold Birthday stamp set...


Supplies used were Whisper White, Old Olive, Pumpkin Pie and Bashful Blue cardstock, Old Olive, Pumpkin Pie and Bashful Blue inks and some retired paper. The icing and balloons have been popped up on dimensionals and I used twine for the string on the balloons. Some silver brads finish it off.

What do you think?

I have my fingers crossed to be able to have another "play" really soon.

Sunday, June 21, 2009

My craft room!

Went shopping today & bought some furniture for my NEW craft room. Hubby is assembling it all as I type & I can't wait until it's all set up. I've never had craft room before. I used to store my stuff in the laundry & stamp on the kitchen bench top so as you can imagine, it's very exciting. The room will double as a study for my girls too, so they, too are excited. I'll keep you posted.

Anyway, I did manage to stamp on the floor & make some more cards using the cute little All in the Family characters. Stamping in a such an untidy room has stumped my creativity so I have stuck with the same layout.

Here are the cards:


Supplies: All in the Family & Short & Sweet stamp sets, Very Vanilla, Chocolate Chip, Bashful Blue cardstock, watercolour paper, black StazOn ink, Chocolate Chip & Bashful Blue markers, blender pen, square punches, oval punches, Cuttlebug Swiss Dots embossing folder & my Big Kick.

Supplies: As above except that the colours used were Not Quite Navy, Pumpkin Pie & Old Olive. Cuttlebug Argyle embossing folder.

Have a great start to the week.

Andrea

Friday, June 12, 2009

We moved!

Well, we finally moved into our new house over the long weekend. What an enormous task!

My crafting supplies are lying a big heap in my one-day-to-be craft room. I stamped away on the floor to create two cards. Sorry about the photos. I was in a real hurry to photograph them & they didn't turn out the best.

The first is for our neighbours who just welcomed a little daughter into the world last week. I love Chocolate Chip, Pretty in Pink & Very Vanilla combination. So sweet. Again, I used my beloved All in the Family stamp set & the Short & Sweet set for the sentiment. I also used my Cuttlebug Swiss Dots embossing folder with my Big Kick, Pretty in Pink Ribbon & my square & oval punches.


The second card is for a little friend who is turning 6 this weekend. I used the Just Cricket & Short & Sweet stamp sets with Chocolate Chip, Real Red & Very Vanilla colours. I also used my Cuttlebug Swiss DOts embossing folder with my Big Kick, and oval punches.


I hope they inspire you with your creations in some way.

Well, thank goodness it's the weekend. I feel completely exhausted so it won't be long before I'm off to bed. I hope you all enjoy your weekend. Take care.